Container gardening often ends in heartbreak: lush, green growth in June followed by yellowing leaves and stunted fruit by August. This failure is rarely a “black thumb” issue; it is an engineering failure.
Most standard advice—particularly the suggestion that a 5-gallon bucket is sufficient for a beefsteak tomato—is incorrect. It leads to root restriction and “hydro-panic,” where the plant consumes available water faster than the soil volume can retain it.
To succeed, you must stop treating the container as a simple holder and start treating it as a life-support system. This guide corrects the geometry, soil physics, and hydration protocols required to grow high-yield heirloom tomatoes in a finite space.
The “Container Reality Check”: Sizing & Material
The single most common cause of failure is undersized containers. A tomato plant’s root mass is directly correlated to its ability to support fruit load. When roots hit the container wall, they circle and bind, signaling the plant to stop vegetative growth and abort fruit production.
The “5-Gallon Trap” (Why Bigger is Better)
A standard 5-gallon bucket offers insufficient buffer for moisture and nutrients for indeterminate varieties. While the plant will survive, it will require watering 2-3 times daily during peak summer heat to prevent wilt.
The Soil Volume to Yield Ratio:
- 5-7 Gallons: Suitable only for Micro-Dwarf or determined “Patio” tomato varieties (e.g., ‘Tiny Tim’, ‘Patio Princess’). Expect 3-5 lbs of fruit.
- 10-15 Gallons: The minimum baseline for standard Determinate (Bush) varieties (e.g., ‘Roma’, ‘Celebrity’). Expect 8-12 lbs of fruit.
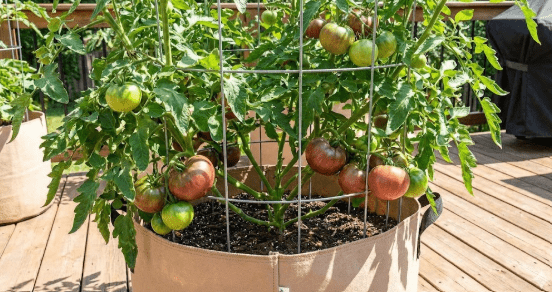
- 20+ Gallons: Required for large Indeterminate Beefsteaks (e.g., ‘Cherokee Purple’, ‘Brandywine’). This volume maintains stable moisture levels, preventing the wet-dry cycles that cause Blossom End Rot.
Fabric vs. Plastic: The Thermodynamics of Roots
CRITICAL WARNING: The “Kiddie Pool” method is only for fabric pots. Do not attempt this with plastic pots. Plastic pots sitting in standing water cannot breathe; the soil will become anaerobic (swampy), causing root rot that will kill your plant in 48 hours
The material of your container dictates the thermal stress on the root zone.
- Black Plastic Pots: In direct sunlight (ambient 90°F), black plastic absorbs heat, driving soil temperatures above 120°F. At these temperatures, root function shuts down, and the plant cannot uptake calcium.
- Fabric Pots (Grow Bags): These are superior for two reasons:
- Evaporative Cooling: The porous fabric allows water to evaporate from the sides, keeping the root zone 10-15°F cooler than plastic.
- Air Pruning: When roots reach the dry edge of the fabric, the tip dies off, forcing the plant to generate new lateral feeder roots. This creates a dense, fibrous root ball.
The Container Geometry Rule
Avoid tall, narrow containers. Tomatoes are top-heavy and develop extensive lateral surface roots. Select containers that are wider than they are tall. This lowers the center of gravity and maximizes the surface area for oxygen exchange.
The Soil Strategy: Don’t Buy “Garden Soil”
Soil in a container requires different physics than soil in the ground. In-ground soil relies on worms and geology for aeration; in a pot, gravity compresses soil into a dense brick that suffocates roots (hypoxia).
Potting Mix vs. Garden Soil
Never use “Garden Soil” or “Topsoil” in containers. These products lack the porosity required for drainage.
- The Physics of Aeration: Container soil must be largely composed of peat moss or coco coir (for water retention) and coarse aggregates like perlite or pine bark fines (for drainage).
- The Ideal Mix: Look for a high-quality potting mix specifically labeled for containers. It should feel light and fluffy when dry.
Can I Reuse Old Soil? (The Refresh Recipe)
You do not need to discard last year’s potting soil, but you cannot use it “raw.” Old soil is depleted of nutrients and compacted.
The 50-30-20 Refresh Protocol:
- 50% Old Soil: Break up clumps and remove old root balls.
- 30% Fresh Compost/Worm Castings: Restores microbial life and micronutrients.
- 20% Fresh Perlite: Re-establishes the air pockets essential for root respiration.
- Add Dolomite Lime: Mix in 1 cup of dolomite lime per 10 gallons of mix. This is a critical preemptive strike against calcium deficiency.
The “Watering Matrix”: A Temperature-Based Schedule
Most guides vaguely suggest watering “when the soil is dry.” In the heat of July, this is too late. We use a proactive logic-based schedule.
The Temperature Rule
- < 75°F: Water every 2-3 days. Perform the “knuckle test” (insert finger 2 inches deep) before watering.
- 75°F – 85°F: Water Daily (Morning). This ensures the plant is fully turgid before the midday sun hits.
- > 90°F (The “Double Tap”): Water deeply in the AM and provide a “cool-down splash” in the late afternoon to lower soil temperature.
The “Vacation Savior” Protocol
The number one anxiety for container gardeners is leaving town.
- The Wine Bottle Trick: Fill a wine bottle with water and jam it upside down into the soil near the stem. It will slowly glug water into the root zone over 2-3 days.
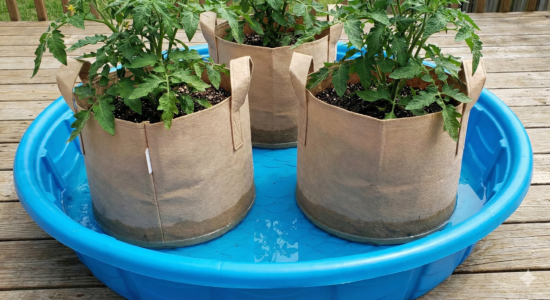
- The Kiddie Pool Method: For absences of 4-7 days, place your fabric pots into a child’s hard plastic kiddie pool filled with 2 inches of water. The pots will wick moisture from the bottom up.
The “2-Stage Feed” Fertilizer Protocol
Tomatoes have two distinct metabolic phases. Using the same fertilizer all season often results in giant leafy plants with zero fruit.
Stage 1: The Green Phase (Vegetative)
- Timing: Planting day until the first flowers appear (Weeks 1-4).
- Goal: Build the “factory” (leaves and stems).
- Protocol: Use a high-nitrogen liquid feed like fish emulsion or a balanced organic granular (5-5-5) every 14 days.
Stage 2: The Red Phase (Flowering/Fruiting)
- Timing: From the moment the first flowers open until harvest.
- Goal: Shift energy to fruit production.
- Protocol: Drop the Nitrogen. Switch to a high-Phosphorus/Potassium fertilizer (e.g., bone meal or specialized “Tomato Tone”). Excess Nitrogen at this stage will force the plant to drop its blossoms.
Pruning & Support: The “Airflow Zone” Blueprint
Container plants are susceptible to fungal issues because they are often clustered together on patios with poor air circulation.
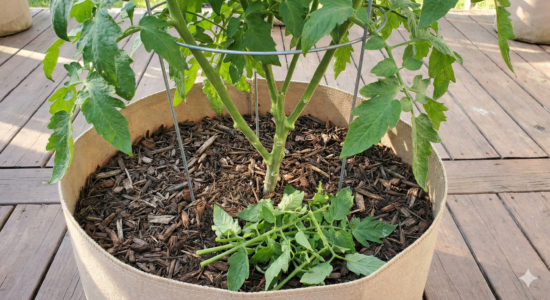
The “Bottom 4 Inches” Rule
Early Blight lives in the soil and splashes onto leaves during watering. To prevent this, remove all growth from the bottom 4 inches of the main stem. This creates an “Airflow Zone” that keeps the foliage dry and disease-free.
Determinates vs. Indeterminates
- Bush (Determinate): Do NOT prune suckers. These varieties have a programmed genetic limit; every branch you cut reduces your harvest. Only clean the bottom stem.
- Vining (Indeterminate): You must prune these to 1 or 2 main stems. If left unpruned in a pot, they will become an unmanageable jungle.
The Support Warning: Standard conical “tomato cages” sold at hardware stores are trash. They cannot support a 20-gallon “Cherokee Purple” that reaches 7–8 feet tall. The plant will topple over, snapping the stem.
- The Solution: Use heavy-duty cattle panel sections cut to size, or 8-foot T-posts driven through the grow bag and into the ground beneath (if on soil). If on a hard patio, use a square “Tom-Tower” style cage anchored to the pot’s handles.
The “Porch Problem”: Manual Pollination
Many container gardeners grow on screened-in porches or high balconies (5th floor+). These areas are dead zones for bees and wind, which are required for pollination.
- The Symptom: Your plant has tons of yellow flowers, but they dry up and fall off without making fruit (Blossom Drop).
- The Fix: You must become the wind. Every morning when the humidity is lowest (around 10 AM – 11 AM), gently flick or vibrate the flower clusters with your finger. You should see a tiny cloud of yellow dust (pollen) release. This guarantees fruit set even without a single bee.
Troubleshooting: What Your Plant is Screaming
Why are my leaves curling?
- Physiological Leaf Roll: If leaves curl upward like a taco shell but remain green and firm, this is a stress reaction to heat or irregular watering. It is not a disease. The plant is trying to minimize surface area to reduce water loss.
- Herbicide Drift: If leaves are twisted, gnarled, and look “melty,” your plant may have been hit by lawn chemicals.
Why do I have black spots on the bottom of the fruit?
This is Blossom End Rot (BER). It is technically a calcium deficiency, but adding calcium rarely fixes it immediately. The cause is usually inconsistent watering. When soil goes bone-dry, the plant cannot transport calcium to the fruit. The fix is the watering schedule, not a spray.
Your 3-Step Success Checklist
Growing tomatoes in containers is not about luck; it is about volume and consistency.
- Go Big: Use 15+ gallon containers for anything other than micro-dwarfs.
- Go Cool: Use fabric grow bags to prevent root cooking in summer heat.
- Go Steady: Adhere to the temperature-based watering matrix to prevent Blossom End Rot.
Leave a Reply